I'm kind of experimenting with video quality right now. Even though these videos are encoded at 720p, but I think since the screen capture itself was working on a 1080p picture they look extra shitty or something. I'll try encoding at 1080p and then watching at 720p and see if that works better, because even though these vids show as 720p on Youtube they look pretty blurry or something.
-
Registration is disabled due to constant spammers. Email [email protected] and we will temporarily re-enable registration for you.
You are using an out of date browser. It may not display this or other websites correctly.
You should upgrade or use an alternative browser.
You should upgrade or use an alternative browser.
Travis's Panzer Corps Dynasty
- Thread starter Travis7401
- Start date
Mystique of Special Units:
In the above video, I had some random Gebirgsjaeger unit show up in Turn 2 as a "reinforcement." Later in the video I noticed that the unit had a huge movement range of 6 (equivalent to a fast tank). I thought this might be a glitch, but I looked into it more after the mission and that unit showed up with a default "hero," which is part of the Role Playing aspect that has been added to Panzer Corps. That Gebirgsjaeger unit is lead by Oleh Dir, a German Sniper during WWII. They have a movement bonus of +3 and an initiative bonus of +3. Initiative is used to determine which unit fires first. Initiative can represent many things, but basically it is used to represent speed/dodging ability of a unit, long range capabilities of a unit, and better equipment/optics of a unit as they allow that unit to get the first shots off in combat. Typically German units have higher initiative than their allied counterparts, due in large part to their superior optics and sights. This unit special unit with +3 movement and +3 initiative will be extremely valuable in the future, as having an infantry unit that can keep up with tanks and always get the first shot will be invaluable.
Oleh Dir was a real German sniper in WWII credited with 120 kills.
Scenario 3: Lodz
Video 2/6
In Turn 3 I managed to link Pz Group A up with the auxiliary units, but 2 of the auxiliary units are still heavily damaged and will probably be lost during the CPU turn. I need to keep 3/5 of these units alive in order to win a decisive victory. Pz Group B has solid success, destroying the Aritillery guarding Sieradz and then suppressed then destroyed the infantry unit guarding that city and captured it. 1 objective down!
During the CPU's turn I lost 2 of my auxiliary units, which means in order to earn a decisive victory I'll have to protect my remaining 3 units closely. Yikes.
In Turn 4, I reorganized Pz Group A and the Auxiliary units so that my fresh troops went to the front while the remaining aux units were able to either reinforce or drop back out of range to reinforce next turn. This link up is turning out to be a lot slower than I expected, and hopefully I won't get hit by a counter attack while I'm busy piddling around. I also discover that the poles re-captured the air base I was using for refueling and my BF109 will crash at the end of Turn 5 if I don't re take it, lol. Poor planning on my part. With Panzer Group B, I scout ahead and see that Lodz is very heavily defended against a frontal assault, as hinted at during the deploy phase. I'll have to flank it one way or another.
GR8 2 B FL G8R
Well-Known Member
The Mystique of Black History Month?
Scenario 3 Lodz:
Video 3 of 6
In turn 5 I managed to re-take the airfield in the South near Pz Group A. This was very important. Had I not retaken the airfield this turn, my BF109 would have crashed. Pz Group A made more progress in this area, destroying another tank and damaging another cavalry unit. The aux force and Pz Group A are now fully united and ready to start pushing North. There is still one infantry group in a city and one cavalry group that I will need to destroy so they don't end up in the rear area, but things are looking much better. Panzer group B did a little maneuvering, but not much action this turn.
Prior to turn 6, the CPU attacked and wiped out one of my armored car units again. I'm trying to find the balance point between scouting far enough ahead to reveal enemy units early and supporting these units with artillery to protect them. They shouldn't be so expendable at this point in the war, so maybe I need to dial it back a notch in sending them too far forward.
In turn 6 I moved Panzer Group B up and received a warning message not to attack head on. I started to flank the lodz defenses. Panzer Group A managed to score a big breakthrough by destroying both the AT gun and the cavalry unit in that area. I still have an entrenched infantry unit in a city that I don't want to leave behind, but things are looking way better in this area. I should be able to start moving North more rapidly.
Last edited:
Scenario 3: Lodz
Video 4/6
In Turn 7, I moved my tank from Pz Group B around the west flank of Lodz. I'll move all my other units around the east flank after looking at the strong points and realizing it would take me way too long to take them. With Pz Group A, I destroyed the final infantry groups in this southern area and started to move forward a little bit now that the breakthrough is complete, but it certainly took me longer than expected.
In turn 8 my Stukas made short work of the Polish TKS tank Northwest of Lodz, which opened up an opportunity for my now half-strenght Panzer 38t to complete the flanking maneuver and emerge behind the lodz artillery defenses. On the east flank, the remainder of Pz group B is now basically linked up with Pz Group A and the Aux forces for a fast push north up the rail line.
Scenario 3: Lodz
Video 5/6
Dogs Bark at the end of this video!
The video starts out with me realizing that I'm on turn 9/13 and I need to get my ass in gear. I decide to bypass Lodz with almost all of my tank forces from both groups and move them north to attack the other 3 remaining objectives in the next couple of turns. I manuever my infantry and artillery around to attack Lodz in the next few turns as well.
In Turn 10 I manage to bypass almost everything with a few tanks and an armored car and neared my troops to the furthest northern city, Lowicz. I also managed to do damage to the AT gun guarding Glowino and destroy the troops guarding Brezing. As bad as things looked as far as a decisive victory goes at the beginning of Turn 9, I managed to make huge progress in 2 turns. By the end of Turn 10 it actually looked like I might have a chance at that decisive victory if the enemy didn't mount a counter attack. My forces were spread a little thin for my taste, but sometimes that is what it takes to snag a decisive victory instead of settling for a marginal victory.
Then my dogs freaked out yay!
Last part will be posted at the end of the day.
Scenario 3: Lodz
Video 6/6
In turn 11 I managed to destroy the infantry guarding Lodz and capture it with a tank that I borrowed from Pz Group A. I also moved my super fast Hero infantry all the way up to Lowicz and then destroyed the artillery supporting the infantry there with a combination of 2 airplane attacks and my recon vehicle. I was also able to capture Glowino by forcing the AT unit to retreat. This was a huge turn and everything went right for me. I was pretty sure I'd captured a decisive victory, unless the enemy mounted a counter attack to steal a victory hex back
in Turn 12 I captured the empty city of Brezing, meaning all the victory hexes but Lowicz were controlled by me. In Lowicz the enemy troops defended valiantly and cause heavy losses to all three of my units. I really had to press the issue at this point and try to win the battle through attrition with only one turn left.
In Turn 13 I finally managed to destroy the troops guarding Lowicz and capture the city, but they really decimated 3 of my units in the process, which will take a good amount of prestige to fix. I finished mopping up a few units and ended the scenario with a Decisive Victory.
I'll post a full version of the video including all 6 parts later tonight. Thanks for following!
Dear Constant Panzer Dyansty Reader,
I know you find my inclusion of reel, an opaque man, in my Nazi wargame dynasty to be highly unrealistic, so please allow me to regale you with the following alternative history:
The mystique of Reel's Infantry Brigade
True History:
It all started prior to the 1936 summer Olympics, when Adolf Hitler threw all available money at proving the superiority of German people in all ways. Germany was just emerging from one of the darkest depressions in modern history, and the Nazis were responsible for that rise. Newly found nationalistic pride was at stake in this greatest of athletic competitions, and Hitler was betting everything on his Aryan Ubermensch to win athletic glory, proving the superiority of their race...
In America, there was much consternation about antisemitism emerging in Nazi German, and a task force was commissioned to determine whether or not the US should boycott these games. In the end, America was home to a strong antisemitic movement of her own at this time, and furthermore placed athletic competition above political squabbles. Prominent African-American newspapers supported the U.S. and wanted them to compete in the 1936 Olympic Games. With many African-American Olympic hopefuls, they viewed this as an opportunity to destroy the Nazi views of Aryan supremacy. In the end, the US Olympic committee decided to attend the 1936 games, while the US government abstained from adding comment. Several Jewish athletes chose to boycott the 1936 Olympic games, and American Jewish organizations boycotted German goods in protests of the US. Two of the American Jewish athletes who chose to compete in the games were pulled from their respective spots by the USOC and not allowed to compete...
In the end, the 1936 Olympics included many historic performances by African American athletes; including silver Medalist Mack Robinson, gold medalist John Woodruff, and winner of 4 gold medals Jesse Owens. Nazi Germany did finish #1 in the medal count, with the United States finishing #2, but it was clear that Jesse Owens was the most remarkable athlete at the games that summer. It was widely reported that Hitler refused to shake hands with Jesse Owens, but this turned out to be false. Owens himself acknowledged that Hitler shook his hand, and sent him a commemorative plaque recognizing his amazing performance. If Owens was snubbed, it was by his own country and his own president. As Owens himself said, "Hitler didn't snub me – it was FDR who snubbed me. The president didn't even send me a telegram." Race relations were hardly an area for the United States to be prideful in 1936.
Alternate History:
Watching the 1936 Olympics; Hitler realized that the most phenomenal athlete was, not one of his beloved Aryan race, but Jesse Owens. The wheels started turning in Hitlers head, and he realized that he needed to start recruiting the real master race, African-Americans, to his side if his plans for global domination would ever succeed. Banking on the strained race relations in the United States at the time, Hitler began to woo prominent African-American soldiers who had volunteered to fight against fascist forces in both the Italo-Abyssinian and Spanish Civil Wars. While these African-Americans had been fighting against his fascist allies, Hitler recognized the unique situation of the proverbial "man without a country," due to the racist nature of America, and offered these soldiers commission in his highly elite mobile infantry forces.
One of these newly recruited commanders was Reel E. Weird, a veteran of the Spanish Civil War. During the Spanish Civil War, Reel had killed fascists with great zeal and made love to many a Maria. He also mounted a few Pilars for good measure because he appreciated their thickness (only @GR8 2 B FL G8R and @digs will understand this allusion). Reel's Spanish Civil War experience was basically the same story as "For Whom the Bell Tolls," but instead of dying like pussy Robert Jordan, Reel charged the fascist forces, hip-firing dual dueling pistols (@Bdub) before throwing a grenade down the barrel of the fascist tank and then taking a piss on the smoldering wreckage. Basically, Hitler realized there was no chance at world domination if he had to fight against bad asses like Reel E Weird.
@Reel's fast marching infantry unit first deployed to General Travis's Panzer Corps during the battle of Lodz, when Hitler realized General Travis was in need of a highly mobile infantry unit to keep pace with Panzer Group A. Reel's unit performed admirably in the battle of Lodz, and the speed at which his men marched was only matched by their tenacity in battle. His unit was key in capturing both the cities of Brezing and Lowicz.
Last edited:
No copypasta, but a good bit of borderline plagiarism from Wiki where facts are concerned.
Here is the full video of the Lodz Scenario. If you are bored enough to watch this, I pity you.
This was a pretty fun scenario. I earned a decisive victory, but it was actually pretty challenging as I almost failed to protect the aux units and I almost failed to capture all of the objectives. I'm considering increasing the difficulty level (playing on default), but will give it a few more scenarios to evaluate since Germany should have a pretty decisive advantage in troop quality in 1939. Typically I struggle a little more to achieve decisive victories and often give up on the goal entirely about halfway through the mission if things aren't going well. If I make it out of Poland without much of a challenge, I'll dial the difficulty up a notch.
This was a pretty fun scenario. I earned a decisive victory, but it was actually pretty challenging as I almost failed to protect the aux units and I almost failed to capture all of the objectives. I'm considering increasing the difficulty level (playing on default), but will give it a few more scenarios to evaluate since Germany should have a pretty decisive advantage in troop quality in 1939. Typically I struggle a little more to achieve decisive victories and often give up on the goal entirely about halfway through the mission if things aren't going well. If I make it out of Poland without much of a challenge, I'll dial the difficulty up a notch.
Any suggestions at this point for how I cover the missions? Anyone prefer the series of short videos, or would you prefer each scenario posted at once in one full video? I have the next scenario all recorded, just need to take the time to upload it to Youterb.
Scenario 4 - Piatek
Overview
Mission Briefing:
This type of mission (a defensive mission in 1939 is part of why I was so excited to play the Grand Campaign DLC in Panzer Corps. In the regular campaign, you actually don't get to play a defensive scenario until much later in the war. With more missions per year, the developers were able to throw some of the smaller operations at me and include this Polish counter attack at Piatek. The initial intelligence given during this mission briefing has been pretty accurate so far, so I should expect wave attacks from the Poles, probably with Cavalry since that was their thing. With the Bzura River between me and the enemy, I should have the opportunity to set up a strong defensive line. I entered the mission and was told that I've been awarded a second SE infantry group as a reward for my decisive victory at Lodz. The limit on SE units is 2 in the 1939 campaign, so I'm set on these for now. The main benefit of these units is that they do not count against my deployment numbers. Essentially they are a free unit.
Mission Strategy
As the deploy phase opened, I was pleased to see that the Bzura River makes a pretty large bend in the area that I'm supposed to defend. The effect of having my forces placed on the end side of the bend is that I will be able to set up a defensive position that benefits from having interior lines. The advance of technology in our modern warfare age has reduced the benefit of interior supply lines to some degree, but even now they are important. In 1939, having interior lines is incredibly important. With interior lines, I will be able to place small forces to guard each bridgehead because I know I can have reinforcements to any trouble areas within a turn or two. I've been tasked with defending 3 cities (Ozorkow, Piatek, and Lowicz) and 4 additional bridges over the Bzura River against the enemy advance. At the deploy phase, I was only able to place one unit at each bridge head, but the majority of my forces were only allowed to deploy in nearby Osse and Glowno, which means I will have to move artillery support forward rapidly. I will also withdraw my troops at the bridges to an adjacent hex on my side of the river. I want them to be able to cover the bridge so that enemy units cannot cross it without fighting, but I don't actually want them on the bridge. River and bridge hexes are much less defensible for a brigade sized unit and any unit placed in them at the end of the turn is extremely vulnerable to attack. By pulling my troops off the bridges themselves, I will force the enemy to move into the dangerous river hex before we fight. In order to win a minor victory, I only need to hold one Victory hex, and Ozorkow seems like a prime candidate because the objective hex is actually in a city overlooking 2 bridges. My infantry in this hex will receive the benefit of entrenchment while also being able to guard two bridge crossings. In order to win a decisive victory, I must hold all 7 victory hexes at the end of the battle. My plan is to let the enemy attack and hold the vulnerable bridge hexes all they want until near the very end of the battle. In turn 19 or 20 I'll counter attack and knock them out in order to attempt to win decisive victory.
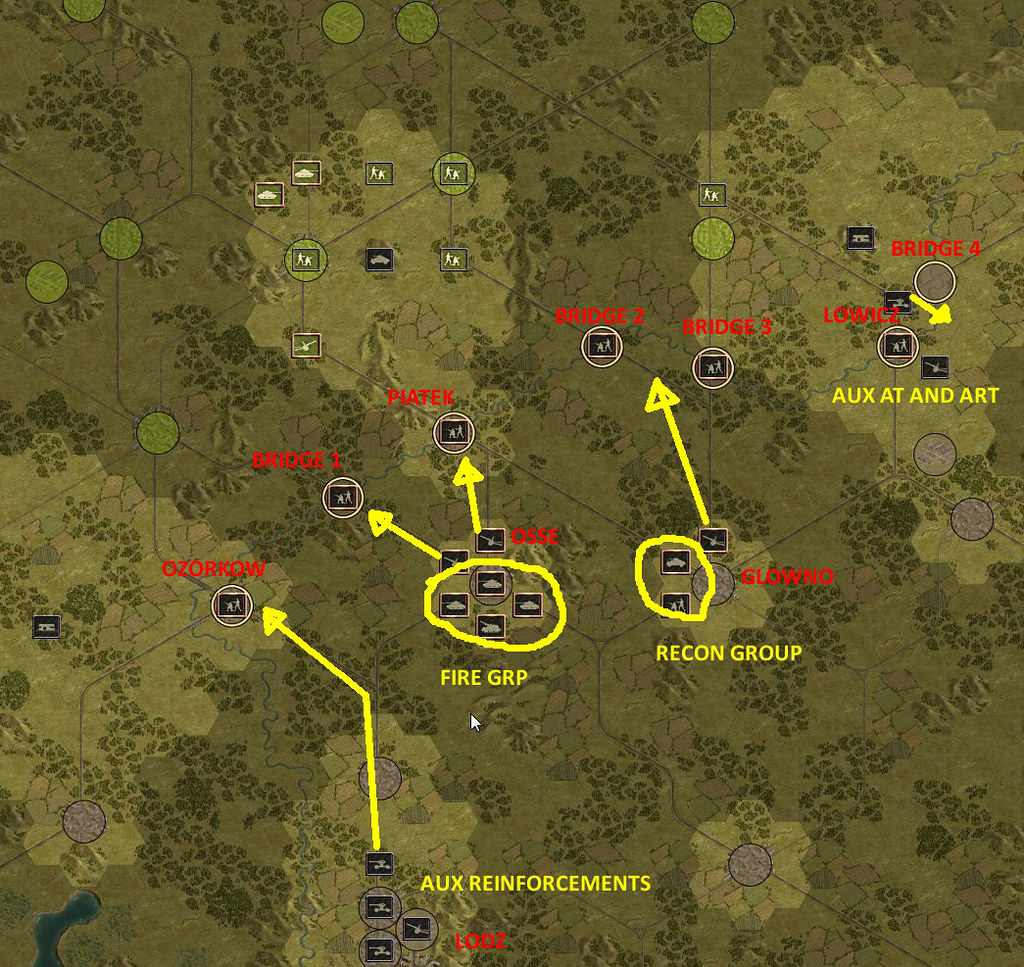
Starting from west to east, I will describe my defensive plans for each objective:
Ozorkow- This is the most easily defensible victory hex as it is placed in a city overlooking a bend in the Bzura River. I only placed a single unit here to guard the bridge, but it was one of my SE infantry units. In addition to my core forces, I was provided with some aux forces to aid in defense and most of them start out far South of me in Lodz. These aux reinforcements consist of 3 x 37mm AT guns and a 75mm artillery piece, all with truck transport. I will rush all 3 forward in order to help my SE infantry guard this most vital position. If I end up not needing the extra AT guns I'll move them down the to another position
Bzura Bridge #1 - I placed one of my groups of Mountain infantry here, because there is an adjacent mountain hex that I will move them into as a defensive position for guarding this bridge. In turn 1, I will bring forward the closest 105mm artillery piece from my core group to provide artillery support. If the defense of Ozorkow looks stout, I will likely move one of the aux AT guns up here as well.
Piatek - I placed my most experienced Wehrmacht troops at this location, and I will move a 105mm artillery piece forward to back them during turn 1
Bzura Bridges #2 and #3 - Due to the proximity of these bridges, I will be able to set my infantry up to guard both bridges while being covered by a single artillery piece. I deployed 2 Wehrmacht infantry units here and will move my last 105mm gun forward in turn 1 to provide artillery support.
Lowicz and Bridge #4 - Again, due to the proximity of these objectives, I should be able to cover both bridges with 2 units and then have a single artillery unit provide support for both. I was given 2 aux units, a 37mm AT gun and a 75mm artillery piece already deployed in this area. I added my 2nd SE infantry unit to the mix and am confident these 3 units should be able to stop any attacks on that flank for long enough for reinforcements to arrive. In addition they are very close to one of my airfields, and will benefit from stuka support if necessary.
Fire Group: With all of the cities/bridges guarded by infantry backed with artillery, I deployed a fire group of 3 Panzer 38t tanks to function as reinforcements for the bridge/city defense. If there are any areas of heavy enemy assaults or breakthroughs, I'll be able to move these tanks forward and throw the enemy back across the river.
Recon Group: If I notice any opportunities for a counter attack, I will send my recon group of 2 SDKFZ armored cars and Reel's Brigade of fast infantry across the bridge in order to scout enemy movements, seize additional enemy cities to gain prestige, and possibly just cause trouble for any vulnerable units like artillery that I might find.
Air Force: Since I haven't encountered any polish air force since scenario 1 and I only have 3 units remaining, I chose to leave the BF109 at home. I deployed the BF110 fighter/bomber and 2 JU87 Stukas. This should be more than enough to add considerable weight to the defense of any trouble area. there are only 2 friendly airfields on the map, one near Lowicz and one near Lodz. This will somewhat limit my ability to help in the middle of the map with my air force:
Summary of Deployed Forces:
Defense of 7 objectives:
Core Forces:
3 x Wehrmacht infantry
2 x SE infantry
1 x Gebirgsjager infantry
3 x 105mm towed artillery
Aux Forces:
4 x 37mm AT guns
2 x 75mm towed artillery
Fire Group:
3 x Panzer 38t tanks
Recon Group:
2 x SDKFZ armored cars
1 x Reel's Brigade
Air Force:
2 x JU87 Stuka Dive Bombers
1 x BF110 fighter bomber
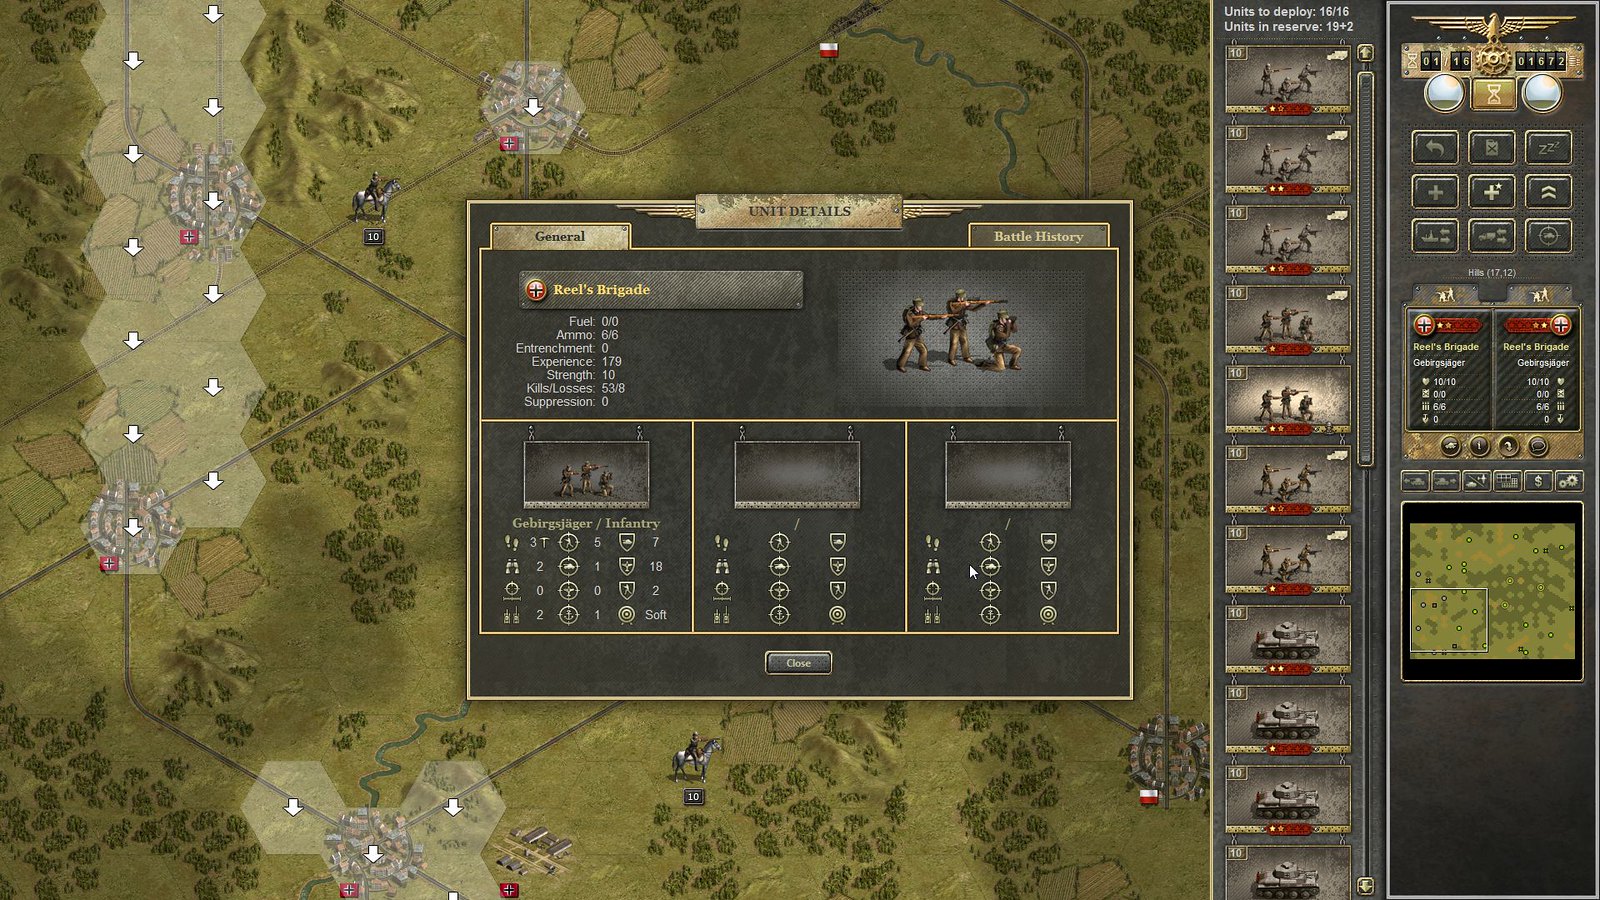
Here is some info on @Reel's Brigade for anyone who is interested in following his progress. He's an elite alpine infantry unit with +3 movement and +3 Initiatve, which gives him a movement range of 6 with an alpine modifier that allows him to move faster than normal units through any mountainous terrain. Basically Reel's Brigade is fast enough to keep up with my tanks on foot and not have to worry about getting bogged down by truck transport logistics.
Overview
Mission Briefing:
This type of mission (a defensive mission in 1939 is part of why I was so excited to play the Grand Campaign DLC in Panzer Corps. In the regular campaign, you actually don't get to play a defensive scenario until much later in the war. With more missions per year, the developers were able to throw some of the smaller operations at me and include this Polish counter attack at Piatek. The initial intelligence given during this mission briefing has been pretty accurate so far, so I should expect wave attacks from the Poles, probably with Cavalry since that was their thing. With the Bzura River between me and the enemy, I should have the opportunity to set up a strong defensive line. I entered the mission and was told that I've been awarded a second SE infantry group as a reward for my decisive victory at Lodz. The limit on SE units is 2 in the 1939 campaign, so I'm set on these for now. The main benefit of these units is that they do not count against my deployment numbers. Essentially they are a free unit.
Mission Strategy
As the deploy phase opened, I was pleased to see that the Bzura River makes a pretty large bend in the area that I'm supposed to defend. The effect of having my forces placed on the end side of the bend is that I will be able to set up a defensive position that benefits from having interior lines. The advance of technology in our modern warfare age has reduced the benefit of interior supply lines to some degree, but even now they are important. In 1939, having interior lines is incredibly important. With interior lines, I will be able to place small forces to guard each bridgehead because I know I can have reinforcements to any trouble areas within a turn or two. I've been tasked with defending 3 cities (Ozorkow, Piatek, and Lowicz) and 4 additional bridges over the Bzura River against the enemy advance. At the deploy phase, I was only able to place one unit at each bridge head, but the majority of my forces were only allowed to deploy in nearby Osse and Glowno, which means I will have to move artillery support forward rapidly. I will also withdraw my troops at the bridges to an adjacent hex on my side of the river. I want them to be able to cover the bridge so that enemy units cannot cross it without fighting, but I don't actually want them on the bridge. River and bridge hexes are much less defensible for a brigade sized unit and any unit placed in them at the end of the turn is extremely vulnerable to attack. By pulling my troops off the bridges themselves, I will force the enemy to move into the dangerous river hex before we fight. In order to win a minor victory, I only need to hold one Victory hex, and Ozorkow seems like a prime candidate because the objective hex is actually in a city overlooking 2 bridges. My infantry in this hex will receive the benefit of entrenchment while also being able to guard two bridge crossings. In order to win a decisive victory, I must hold all 7 victory hexes at the end of the battle. My plan is to let the enemy attack and hold the vulnerable bridge hexes all they want until near the very end of the battle. In turn 19 or 20 I'll counter attack and knock them out in order to attempt to win decisive victory.
Starting from west to east, I will describe my defensive plans for each objective:
Ozorkow- This is the most easily defensible victory hex as it is placed in a city overlooking a bend in the Bzura River. I only placed a single unit here to guard the bridge, but it was one of my SE infantry units. In addition to my core forces, I was provided with some aux forces to aid in defense and most of them start out far South of me in Lodz. These aux reinforcements consist of 3 x 37mm AT guns and a 75mm artillery piece, all with truck transport. I will rush all 3 forward in order to help my SE infantry guard this most vital position. If I end up not needing the extra AT guns I'll move them down the to another position
Bzura Bridge #1 - I placed one of my groups of Mountain infantry here, because there is an adjacent mountain hex that I will move them into as a defensive position for guarding this bridge. In turn 1, I will bring forward the closest 105mm artillery piece from my core group to provide artillery support. If the defense of Ozorkow looks stout, I will likely move one of the aux AT guns up here as well.
Piatek - I placed my most experienced Wehrmacht troops at this location, and I will move a 105mm artillery piece forward to back them during turn 1
Bzura Bridges #2 and #3 - Due to the proximity of these bridges, I will be able to set my infantry up to guard both bridges while being covered by a single artillery piece. I deployed 2 Wehrmacht infantry units here and will move my last 105mm gun forward in turn 1 to provide artillery support.
Lowicz and Bridge #4 - Again, due to the proximity of these objectives, I should be able to cover both bridges with 2 units and then have a single artillery unit provide support for both. I was given 2 aux units, a 37mm AT gun and a 75mm artillery piece already deployed in this area. I added my 2nd SE infantry unit to the mix and am confident these 3 units should be able to stop any attacks on that flank for long enough for reinforcements to arrive. In addition they are very close to one of my airfields, and will benefit from stuka support if necessary.
Fire Group: With all of the cities/bridges guarded by infantry backed with artillery, I deployed a fire group of 3 Panzer 38t tanks to function as reinforcements for the bridge/city defense. If there are any areas of heavy enemy assaults or breakthroughs, I'll be able to move these tanks forward and throw the enemy back across the river.
Recon Group: If I notice any opportunities for a counter attack, I will send my recon group of 2 SDKFZ armored cars and Reel's Brigade of fast infantry across the bridge in order to scout enemy movements, seize additional enemy cities to gain prestige, and possibly just cause trouble for any vulnerable units like artillery that I might find.
Air Force: Since I haven't encountered any polish air force since scenario 1 and I only have 3 units remaining, I chose to leave the BF109 at home. I deployed the BF110 fighter/bomber and 2 JU87 Stukas. This should be more than enough to add considerable weight to the defense of any trouble area. there are only 2 friendly airfields on the map, one near Lowicz and one near Lodz. This will somewhat limit my ability to help in the middle of the map with my air force:
Summary of Deployed Forces:
Defense of 7 objectives:
Core Forces:
3 x Wehrmacht infantry
2 x SE infantry
1 x Gebirgsjager infantry
3 x 105mm towed artillery
Aux Forces:
4 x 37mm AT guns
2 x 75mm towed artillery
Fire Group:
3 x Panzer 38t tanks
Recon Group:
2 x SDKFZ armored cars
1 x Reel's Brigade
Air Force:
2 x JU87 Stuka Dive Bombers
1 x BF110 fighter bomber
Here is some info on @Reel's Brigade for anyone who is interested in following his progress. He's an elite alpine infantry unit with +3 movement and +3 Initiatve, which gives him a movement range of 6 with an alpine modifier that allows him to move faster than normal units through any mountainous terrain. Basically Reel's Brigade is fast enough to keep up with my tanks on foot and not have to worry about getting bogged down by truck transport logistics.
Last edited:
Scenario 4 - Piatek
Video 1/3
During the deploy phase, I gave another brief overview of the strategy I will employ to defend the river. Infantry+artillery support to guard each bridgehead and then a fire group of 3 tanks and a recon group to exploit any counterattack opportunities.
Turn 1 is just me shuffling my infantry into position to guard the bridges from adjacent high ground, and moving artillery up to support. During the CPU turn, a fair amount of cavalry and enemy infantry move forward on to the river hexes.
During Turn 2, I destroyed as many units as possible where the enemy has placed them on river hexes, making them vulnerable. During the CPU turn, polish units kept attempting to drive my infantry back at the bridgeheads, but with artillery already in place it is pretty much a slaughter.
During Turn 3, I continued to hammer units parked on River hexes, with great success. My Stukas are doing awesome in air support role at this point, destroying 50% of the strength of enemy units when they are on river hexes. By the end of Turn 3 the enemy has swarmed the southwest flank, but all of my bridges are still holding.
During Turn 4, the enemy kind of stalled in their attack and I wasn't able to destroy as many units as I had in previous turns, as there were fewer left on river hexes. I started to alternate refueling my planes as well. During the CPU turn, the enemy brought forward an artillery piece, which could cause some trouble in the future.
During Turn 5, I continued to destroy units parked on river hexes and also knocked the enemy artillery down to 6 strength. I started getting a little bored and there was really no action at all in the middle of the front, so I sent my armored cars and Reel's brigade across the river on a scouting mission. During the CPUs turn, a polish biplane flew forward and started to attack one of my tanks. They also attempted a crossing and tried to destroy my artillery unit.
Last edited:
Scenario 4 - Piatek
Video 2/3
In Turn 6, I continued to destroy all enemy units on river hexes, and everything is still going well. This part is probably getting boring for anyone watching at this point, but basically I've got all of the bridgeheads blocked and the poles haven't tried anything super aggressive yet other than fording the river to attempt to attack my artillery in Turn 5. I moved my artillery and brought a tank up as reinforcement and forced them to retreat back across the river. I continued my scouting mission with double armored cars and Reel's Brigade across the river and spotted an infantry unit to the North.
I won't go over the rest of the turns much because they were just more of that same slaughter, lol. Eventually the poles stopped their attack in the Southwest flank and tried to attack in the Northeast and met with similar results after I rushed my tanks up there to act as reinforcements.
Last edited:

Reel, I use Microsoft Encoder for these vids (free). The vid capture software that "came with" my card didn't actually come with it. It launched as BETA software just recently. Strangely, you can't use it to record desktop or games that don't run with some necessary version of directx
Scenario 4 - Piatek
Video 2/3
This video is a bit long @ 20 minutes, but this scenario was actually kind of boring because the poles are way too shitty to be attacking me when I have such a solid defensive position behind a river and with interior lines. I got bored and used my recon forces to cause some more havoc up North, and I got a little too cavalier because I actually put Reel's unit in more danger than I was bargaining for and had to cover his retreat with my armored cars, one of which was destroyed. The other was able to limp away further north (retreat back to my lines was cut off) and had to just chill up there hidden in the woods for the rest of the scenario. It obviously sucks to be a recon unit in General Travis's Panzer Army. Reel's brigade gave a solid account of themselves behind enemy lines and made it safely back behind our lines to fight another day!
Overall this scenario was a pretty fun change of pace from the normal polish blitzkrieg scenarios, but it was a bit lopsided with my superior forces in such a great position. I've got a tough battle coming up for Warsaw, but if that seems too easy I might consider changing my settings to make things a little harder.
The Mystique of the Battle of Bzura (somewhat depicted by the Piatek Scenario)
From Wiki:

Bombed Polish Artillery During Battle of Bzura
From Wiki:
The Polish defensive plan called for a strategy of encirclement: they were to allow the Germans to advance in between two Polish Army groups in the line between Berlin and Warsaw-Lodz, at which pointArmia Prusy would move in and repulse the German spearhead, trapping them. In order for this to happen, Armia Prusy needed to be fully mobilized by 3 September. However, Polish military planners failed to foresee the speed of the German advance and predicted that Armia Prusy would need to be fully mobilized by 16 September, by which time it was too late.
The largest battle during this campaign—the Battle of Bzura—took place near the Bzura river west of Warsaw and lasted 9–19 September. Polish armies Poznań andPomorze, retreating from the border area of the Polish Corridor, attacked the flank of the advancing German 8th Army, but the counterattack failed after initial success. After the defeat, Poland lost its ability to take the initiative and counterattack on a large scale. German air power was instrumental during the battle. The Luftwaffe's offensive broke what remained of Polish resistance in an "awesome demonstration of air power". The Luftwaffe quickly destroyed the bridges across the Bzura River. Afterward, the Polish forces were trapped out in the open, and were attacked by wave after wave of Stukas, dropping 50 kg (110 lb) "light bombs" which caused huge numbers of casualties. The Polish anti-aircraft batteries ran out of ammunition and retreated to the forests, but were then "smoked out" by the Heinkel He 111 and Dornier Do 17s dropping 100 kg (220 lb) incendiaries. The Luftwaffe left the army with the task of mopping up survivors. The Stukageschwaders alone dropped 388 t (428 short tons) of bombs during this battle.
Bombed Polish Artillery During Battle of Bzura
Scenario 5 - Kampinos Forest
Overview
As a result of my Decisive Victory at Piatek, I've been given the opportunity to smash forward into the forested Kampinos Region west of Warsaw in an attempt to disrupt the retreating Polish Forces. I forgot to take a screencap of the mission description, but the general idea is that I'm supposed to capture 3 city objectives in order to receive a marginal victory or capture all 3 city objectives and also destroy 12 retreating troop trains in order to secure a decisive victory. If I'm able to destroy all 12 troop trains, I will face much less enemy resistance when I eventually assault the city of Warsaw.
Strategy:
In typical fashion for assaults, I've divided my forces into Pz Group A and Pz Group B. Group B, the infantry and artillery heavy group will push forward toward Gorki and Kampinos with the intention of siege operations on all three cities if neccesary. Group A, my mechanized group + Reels Brigade will flank the enemy position through the open south country in an effort to cut off retreat paths for the troop trains and possibly assault Turskaw if everything goes well. Once I find the troop trains, I anticipate it will be perfect work for Stukas, so I've purchased an additional dive bomber. Due to the polish biplanes encountered in the previous mission, I've also decided to bring along a fighter as well. The auxiliary forces available for this mission consist of 2 scout cavalry units, so I'll attach one to each Panzer group.
Summary of Deployed Forces:
Panzer Group A:
3 x Panzer 38t Tanks
1 x SDKFZ Armored Scout Car
1 x Sturmpanzer self propelled artillery
1 x Reel's Brigage
1 x Aux Cavalry scout
Panzer Group B:
2 x SE Infantry
1 x Wehrmacht Infantry
1 x SDKFZ Armored Scout Car
2 x Panzer 38t Tanks
2 x 105mm towed artillery
1 x Aux Cavalry scout
Air Force:
3 x JU87 Stuka Dive Bombers
1 x BF109 Fighter
Overview
As a result of my Decisive Victory at Piatek, I've been given the opportunity to smash forward into the forested Kampinos Region west of Warsaw in an attempt to disrupt the retreating Polish Forces. I forgot to take a screencap of the mission description, but the general idea is that I'm supposed to capture 3 city objectives in order to receive a marginal victory or capture all 3 city objectives and also destroy 12 retreating troop trains in order to secure a decisive victory. If I'm able to destroy all 12 troop trains, I will face much less enemy resistance when I eventually assault the city of Warsaw.
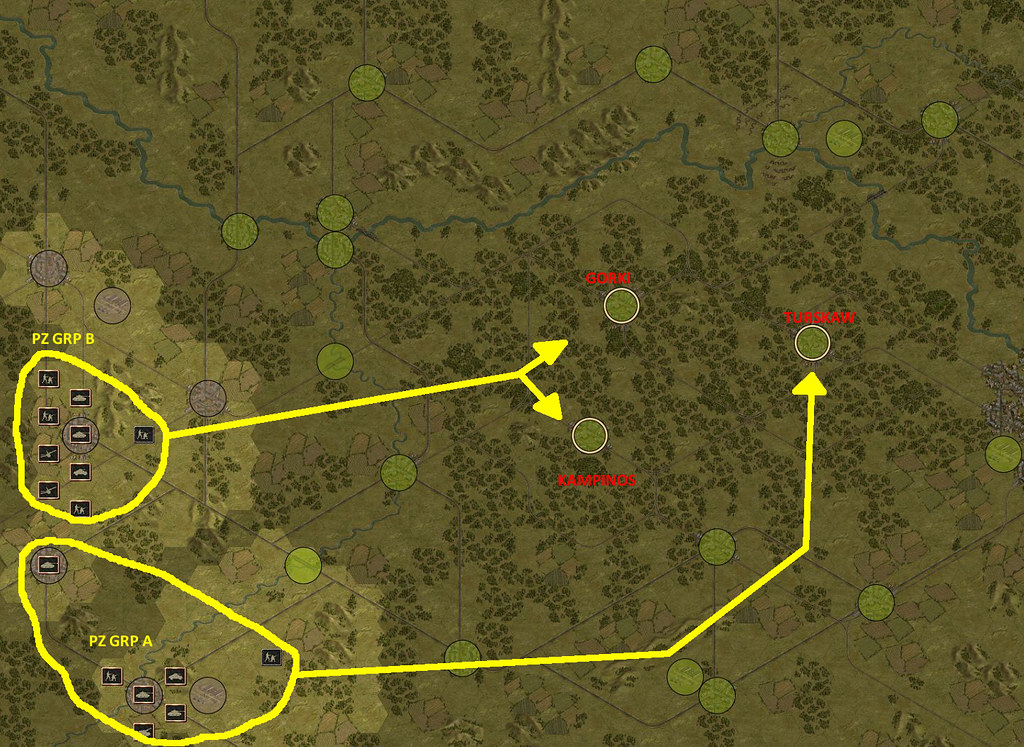
Strategy:
In typical fashion for assaults, I've divided my forces into Pz Group A and Pz Group B. Group B, the infantry and artillery heavy group will push forward toward Gorki and Kampinos with the intention of siege operations on all three cities if neccesary. Group A, my mechanized group + Reels Brigade will flank the enemy position through the open south country in an effort to cut off retreat paths for the troop trains and possibly assault Turskaw if everything goes well. Once I find the troop trains, I anticipate it will be perfect work for Stukas, so I've purchased an additional dive bomber. Due to the polish biplanes encountered in the previous mission, I've also decided to bring along a fighter as well. The auxiliary forces available for this mission consist of 2 scout cavalry units, so I'll attach one to each Panzer group.
Summary of Deployed Forces:
Panzer Group A:
3 x Panzer 38t Tanks
1 x SDKFZ Armored Scout Car
1 x Sturmpanzer self propelled artillery
1 x Reel's Brigage
1 x Aux Cavalry scout
Panzer Group B:
2 x SE Infantry
1 x Wehrmacht Infantry
1 x SDKFZ Armored Scout Car
2 x Panzer 38t Tanks
2 x 105mm towed artillery
1 x Aux Cavalry scout
Air Force:
3 x JU87 Stuka Dive Bombers
1 x BF109 Fighter
I just received a new Hero tank unit (I'm a couple scenarios ahead right now) interested in being tank commander? The Hero units are kind of fun because their special abilities make them really easy to become attached to and frustrating to lose.
Scenario 5 - Kampinos Forest
Video 1/5
Turn 1, as per usual, is pretty boring as I just move some units forward. I did manage to spot three troop trains up near Panzer Group B. During the CPU's turn, a few units came hard and pissed after the auxiliary cavalry unit with Panzer group B.
Turn 2 consisted of me using the Stukas to great effect on the troop trains I found near Pz Group B, destroying all 3 sets of trains I spotted in a single turn. With Stukas being this effective, the only tough part will be finding the trains, making me even more confident in my plan to rapidly move Pz Group A to the rear area to prevent retreat. Lots of infantry spotted guarding the bridge crossing in front of Pz Group B, look to have a fight on my hands! Pz Group A move forward without finding any enemy units. Reel's brigade marched for approximately 60 miles in one day, like a boss. During the CPU's turn, a polish fighter jet flew forward and attacked my Stukas and did a little damage, while the poles also brought units forward to attack my infantry in Pz Group B.
In Turn 3, I flew my BF109 in to attack the polish biplane and hammered them, knocking down to 2 strength and then flew my damaged stuka back to the airbase for repairs. Reels brigade completed another 50+ mile forced marched and then attacked an entrenched AA unit at the 7:25 mark. Reel didn't suffer any loses, but only did 1 unit of damage. Must have been tired from the march. Pz group B managed to grind forward further and used a combination of artillery bombardment, and stutka attacks to smash a couple of polish units, destroying one tank and forcing another group of infantry to retreat back across the river. Slow grinding advances are what Pz group B was made for.
fignuts
See You Next Wednesday
I just received a new Hero tank unit (I'm a couple scenarios ahead right now) interested in being tank commander? The Hero units are kind of fun because their special abilities make them really easy to become attached to and frustrating to lose.
I'll be a Hero unit.

Scenario 5 - Kampinos Forest
Video 2/5
In Turn 4, @Reel's brigade starts things off @ 0:25 by destroying an enemy unit with 4 strength in a city hex. Panzer Group A also took another city hex and has basically faced almost zero resistance so far along the southern flank. My air force was basically all out of fuel, so I flew most of them to bases to be able to come back in turn 5 to make more attacks. Panzer Group B took the bridgehead, which will allow me to cross the river in the next couple of turns
In turn 5, I found another set of trains by scouting forward with my BF109, but it will be another turn or two before I can get the stukas there via the forward airbase. One of my infantry groups (9th Wehrmacht) in Panzer Group B was awarded the Iron Cross for 100 kills in this turn. 2 units across the bridge and the rest of my units stacked to take advantage in the next couple of turns. At 5:30 I took Reel's unit on another 50 mile march and attacked a polish infantry unit in the woods. They did 6 strength damage to the enemy and didn't lose anyone.
In turn 6, Panzer Group B continued their movement across the river, destroying an infantry group along the way. Panzer Group A was able to destroy two trains, and then at 8:40, Reel's brigade wiped out the remaining troops in the infantry group he attacked last turn.
Last edited:
Fignuts has taken over command of the hero panzer unit with war hero Alber Kerscher serving under him as tank commander of one of his tanks. We will first see him in action in the 6th Scenario.
The Mystique of Albert Kerscher:

Albert Kershcer was a highly decorated Panzer Commander who served from 1939 all the way to 1945. Wikipedia has a summary of his awards, and he apparently not only survived the war, but lived until 2011. He was credited with 100+ tank kills during the war (he fought on the Eastern Front where keeping stats was apparently not all that important). As a highly decorated commander, the fact that he was not executed for war crimes is interesting and potentially telling. It also appears that he served for a long time in the post war West German Army as well, so I'll have to do more detailed research to find out more about his story.
Here is the brief wiki summary of his career and awards.
The Mystique of Albert Kerscher:
Albert Kershcer was a highly decorated Panzer Commander who served from 1939 all the way to 1945. Wikipedia has a summary of his awards, and he apparently not only survived the war, but lived until 2011. He was credited with 100+ tank kills during the war (he fought on the Eastern Front where keeping stats was apparently not all that important). As a highly decorated commander, the fact that he was not executed for war crimes is interesting and potentially telling. It also appears that he served for a long time in the post war West German Army as well, so I'll have to do more detailed research to find out more about his story.
Here is the brief wiki summary of his career and awards.
Albert Kerscher (29 March 1916 – 12 June 2011) was a highly decorated Oberfeldwebel in the Wehrmacht during World War II. He was also a recipient of the Knight's Cross of the Iron Cross. The Knight's Cross of the Iron Cross was awarded to recognize extreme battlefield bravery or successful military leadership.
Awards and decorations
- Iron Cross (1939)
- 2nd Class
- 1st Class
- Panzer Badge
- in Silver
- Grade II
- Grade III
- Grade IV (15 February 1945)
- Eastern Front Medal
- Knight's Cross of the Iron Cross on 23 October 1944 as Feldwebel and panzer commander in the 2./schwere Panzer-Abteilung 502
Last edited:
Scenario 5 - Kampinos Forest
Video 3/5
In turn 7, I destroyed the last of the set of 3 trains encountered by Panzer Group A. I also scouted the edge of Warsaw and found formidable defenses and backed off. @Reel's Brigade again proved to be the heroes of this battle by destroying a Polish Cavalry unit at 0:50. I flew some stukas around to do some bombing and spotted another group of 3 trains that I will attack next turn. I managed to get 2/3rds of Panzer Group B across the river and reinforce a couple of the damaged units.
In turn 8, Panzer group B destroyed another tank and moved almost all units across the river. The infantry is starting to take some damage, so it might be a couple of turns before I can fully breakthrough and prepare an attack on one of the cities. So far this is definitely the stiffest resistance area. I also spotted another train or set of trains, meaning I should have found all 12 I need to destroy at this point, and it is just a matter of letting my stukas work on them, which they did in the north. Reels Brigade did more work at 5:40 and is now out of Ammo, lol. The rest of Panzer Group A was able to clean up the remnants of the AA gun Reel's brigade shattered. Panzer Group A is nearly out of ammo acrros the board now and will need a refitting turn before attacking Turskaw.
In turn 9, I used Panzer Group B and a Stuka attack to destroy another train. In the video I said it was 6 total, but re-watching I'm up to 7 destroyed now. I also wiped out some remnant infantry and managed to reinforce a couple of my units. I destroyed 2 more trains in the north with my stukas, bringing the total up to 9/12. I then resupplied the troops in panzer group A and moved a few that weren't low on supplies into more favorable positions for attacking Turskaw in the next few turns.
Last edited:
Scenario 5 - Kampinos Forest
Video 4/5
In turn 10, I destroyed 2 more trains, bringing my total up to 11/12. I started to work on bombarding Terskaw with Panzer Group A and Panzer Group B made more progress moving forward, splitting to attack Gorki and Kampinos in the next few turns. I also split a small group off from Panzer Group A to attack artillery units guarding Kampinos from the rear.
In turn 11, I destroyed trains #12 and #13 and can now focus on capturing all 3 cities in the few remaining turns. With Panzer Group A, I destroyed the artillery providing support for Turskaw and then at 7:15, @Reel's Brigade attacks an entrenched cavalry unit and inflicts heavy losses on them.
In turn 12, I continued to do some work with Panzer Group A and managed to capture Turskaw with Reel's Brigade at 8:25 and then they also attacked and completely destroyed a 6 strength polish infantry unit. I continued to inflict damage on the troops guarding Kampinos with Panzer Group B and the force I split off from Panzer Group A. With only 2 turns left it looks like I should be able to capture this without issue, but Gorki might be difficult to take.
Scenario 5 - Kampinos Forest
Video 5/5
In turn 13, Panzer Group B and the attached forces from group A surrounded kampinos for the final assault and also stacked my forces around Gorki for the final assault as well. With 2 artillery pieces and a Stuka ready to hammer the troops in Gorki, I'm sure I should be able to take it in time unless there is some sort of counter attack.
In turn 14, I moved Reel's brigade back to Turskaw to guard against a potential polish counterattack from the north with a polish heavy tank in view after the computer's turn. I then used bombardment and stuka attacks to soften up Gorki for the assault and was able to take the city. I also realized I had neglected one of my Stukas and it did not have enough fuel to return to the airbase and would crash next turn if I don't end the mission now. With that in mind, I attacked and took Kampinos as well, hoping to force an early victory to save my stuka. A little Gamesmanship, but I hate losing an experienced stuka.
During the CPU's turn, the Polish heavy tank and a cavalry unit both attacked the tank guarding the outskirts of Turskaw and destroyed one of my experienced tanks. BOOOO! Fortunately, the CPU's turn ended and I was awarded a decisive victory and was able to keep my stuka!
Thoughts on this battle:
This was a fun scenario with an added twist requiring the destruction of some troop trains in order to ensure decisive victory and limit polish reinforcements for the eventual assault on Warsaw. That type of link between missions is why I enjoy these grand campaign scenarios. I still think things are a little easier than I'd like, but am hesitant to increase the difficulty because this early war phase is all about building an experienced core to eventually assault Russia. So even if I'm winning comfortably in these scenarios, I need to remember that Germany defeated the poles relatively comfortably in real life as well. So far I'm really enjoying using two distinct styles of Panzer groups that operate relatively independently, and I think the strategy and flexibility afforded by a multiple pronged attack is part of what has allowed me to win decisive victories. This scenario was a perfect example, with Panzer Group B getting bogged down by stiff polish resistance, if I'd have tried a frotnal assault with my whole army, I doubt I could have earned a decisive victory. Fortunately, I took Panzer Group A down the lightly guarded southern flank and was able to destroy several troop trains and capture Turskaw from behind and then turning to assist Panzer Group B with the final assault on the remaining objectives. Reel's brigade was almost unfair in this battle, as they are now getting close to the experience cap for 1939 they are a super fast and hard hitting infantry group, and in the early war stages that makes them a force to be feared.
Scenario 6 - Modlin
Objective Overview
In this scenario, I'm tasked with making a rapid push south to capture the Modlin Fortress and several other key Polish cities. From a grand strategy view, the Modlin Fortress protected the northern approach to Warsaw, and with the western and southern approaches to Warsaw already captured by me in previous scenarios, the capture of Modlin fortress would complete the envelopment of Warsaw and allow me to turn the ongoing siege of the southern/western flanks of Warsaw into a full on assault on the city. I've been told to expect the toughest resistance yet near the Modlin fortress, as there are rumors of a heavily armored train and lots of artillery and anti-aircraft present. In order to achieve a marginal victory, I must capture 3/4 city objectives. In order to achieve a decisive victory, I must capture all 4 city objectives, including Modlin, and also destroy both large gun emplacements at Modlin Fort.
Strategy
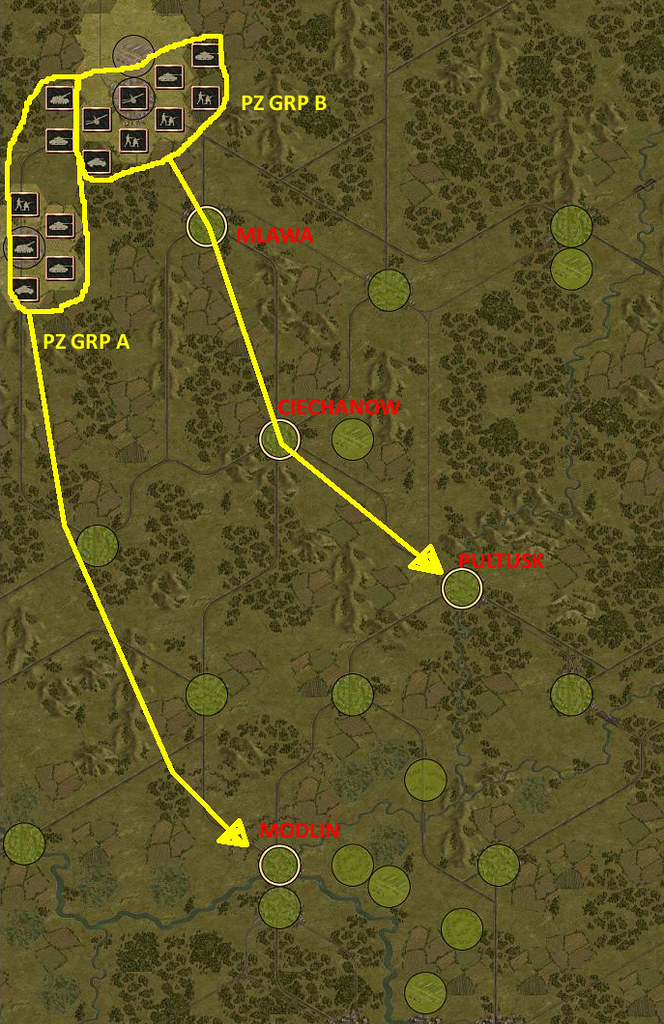
Once again, this scenario seems tailored for a Panzer Group A and Panzer Group B type deployment split. I'll take Panzer Group A rapidly down the west flank, bypassing everything possible and start the assault on Modlin as early as possible, since heavy fortifications are rumored. Panzer Group B will utilize their infantry and artillery to slowly move forward and assault the 3 main objectives of Mlawa, Ciechanow, and Pulutsk in order. If the defenses around Modlin prove too tough for Panzer group A, I can always change goals and turn east to help Panzer Group B capture Pultusk in order to simply achieve a marginal victory. Due to the siege goal at the end of Panzer Group A's plan, I've given them a second set of Sturmpanzer self propelled artillery.
Deployment of Forces:
Panzer Group A:
3 x Panzer 38t tanks
1 x SDKFZ armored car
1 x Reel's Bridgade
2 x Sturmpanzer self propelled artillery
Panzer Group B:
2 x SE infantry
1 x Wehrmacht infantry
2 x Panzer 38t tank
1 x SDKFZ armored car
2 x 105mm towed artillery
Air Force:
3 x JU87 Stuka Dive Bombers
1 x BF109 fighter
(Note, @fignuts hero unit is assigned to me in turn 2 of this mission)
Objective Overview
In this scenario, I'm tasked with making a rapid push south to capture the Modlin Fortress and several other key Polish cities. From a grand strategy view, the Modlin Fortress protected the northern approach to Warsaw, and with the western and southern approaches to Warsaw already captured by me in previous scenarios, the capture of Modlin fortress would complete the envelopment of Warsaw and allow me to turn the ongoing siege of the southern/western flanks of Warsaw into a full on assault on the city. I've been told to expect the toughest resistance yet near the Modlin fortress, as there are rumors of a heavily armored train and lots of artillery and anti-aircraft present. In order to achieve a marginal victory, I must capture 3/4 city objectives. In order to achieve a decisive victory, I must capture all 4 city objectives, including Modlin, and also destroy both large gun emplacements at Modlin Fort.
Strategy
Once again, this scenario seems tailored for a Panzer Group A and Panzer Group B type deployment split. I'll take Panzer Group A rapidly down the west flank, bypassing everything possible and start the assault on Modlin as early as possible, since heavy fortifications are rumored. Panzer Group B will utilize their infantry and artillery to slowly move forward and assault the 3 main objectives of Mlawa, Ciechanow, and Pulutsk in order. If the defenses around Modlin prove too tough for Panzer group A, I can always change goals and turn east to help Panzer Group B capture Pultusk in order to simply achieve a marginal victory. Due to the siege goal at the end of Panzer Group A's plan, I've given them a second set of Sturmpanzer self propelled artillery.
Deployment of Forces:
Panzer Group A:
3 x Panzer 38t tanks
1 x SDKFZ armored car
1 x Reel's Bridgade
2 x Sturmpanzer self propelled artillery
Panzer Group B:
2 x SE infantry
1 x Wehrmacht infantry
2 x Panzer 38t tank
1 x SDKFZ armored car
2 x 105mm towed artillery
Air Force:
3 x JU87 Stuka Dive Bombers
1 x BF109 fighter
(Note, @fignuts hero unit is assigned to me in turn 2 of this mission)
She doesn't like my computer gaming nearly as much as console gaming where I'm in the living room and she can sit next to me and watch whatever guilty pleasure show she wants on her Ipad. Other than that, I think she views all video games as indecipherable unless it is a game she wants to watch me play (like The Last of Us/Walking Dead). What does your wife think of you being in charge of a Nazi Brigade?
Starting this week my favorite hobby will be feasible again, and she enjoys it as well, which makes things a lot easier. The pond should be thawed by Wednesday afternoon if the weather report holds, and then vidya gets put on the back burner. Fortunately for you Panzer readers, I'm several missions ahead at this point and have everything recorded and ready for upload. I should finish the last mission of the 1939 campaign this week some time.
Starting this week my favorite hobby will be feasible again, and she enjoys it as well, which makes things a lot easier. The pond should be thawed by Wednesday afternoon if the weather report holds, and then vidya gets put on the back burner. Fortunately for you Panzer readers, I'm several missions ahead at this point and have everything recorded and ready for upload. I should finish the last mission of the 1939 campaign this week some time.
Scenario 6 - Modlin
Video 1/5
In turn 1, Panzer group A moved forward encountering zero enemy opposition. I then took a scout car from Group B forward and spotted artillery and a tank backing the infantry guarding Mlawa. I brought my Stukas in and knocked the tank and artillery down by 4 strength each. I followed this up with 2 tank attacks and an infantry attack and destroyed the tank.
In turn 2, @fignuts hero tank brigade showed up! Due to their proximity to Panzer Group B, I attached them for this scenario, but I've got different plans for the future. His hero unit has +2 attack, +2 Defense, and +2 spotting. The spotting feature is my favorite part since I'll be able to use him as a recon unit in the future. In Fignut's first action with my group at the 5:20 mark in the video, he destroyed an artillery piece that had been knocked down to 1 strength by a stuka attack. I also bombarded the infantry in Mlawa with 2 stukas to reduce their entrenchment, while bypassing Mlawa with my tanks and armored cars. I moved my infantry and artillery forward to start siege operations. Following two bombardments, the polish infantry guarding Mlawa was fully suppressed and I was able to destroy them completely and take the first objective ahead of schedule. I moved Panzer group A forward and bombarded a half strength polish infantry unit guarding a non-objective city and then at 7:20 I attacked them with @Reel's brigade and wiped them out.
In turn 3, I moved Panzer group B forward to ciechanow and prepared for an assault next turn. Ciechanow is guarded by infantry backed with artillery and AA guns and an AT gun as well. Pretty stout defenses, but the poles made a mistake by moving their AA gun to the front where my tanks and infantry can destroy it with artillery support next turn, which will allow my stukas to start working. I drove the scout car for Panzer Group A forward and spotted the outer line of defense for Modlin, consisting of cavarly units and strongpoints. Panzer group A isn't made for fighting entrenchments, so I'm a little concerned about the path I picked. At the 9:45 mark Reel's brigade moves forward and destroys another half strength polish unit in one assault.
Scenario 6 - Modlin
Video 2/5
In turn 4, I used the artillery from Panzer Group B to suppress the AA gun guarding Ciechanow, and once that was fully suppressed, I brought forward a stuka to hit the Artillery and used my second artillery piece to bombard and suppress it. With both units suppressed, I was able to use my infantry to destroy the AA and then bring a tank forward to destroy the Artillery. I decided to wait for the next turn to assault the infantry in Ciechanow, since I'll have two artillery pieces backing them. Then with Panzer Group A, I moved forward to assault the Polish entrenchements. I bombarded a strong point and then attacked with Reel's brigade at 3:05 and destroyed 3 of the fort's strength. Right after the kills showed, a notification popped forward letting me know that @Reel's brigade was awarded an Iron Cross second class (for his 100th kill). I then followed up with a tank attack and destroyed the already damaged strong point.
In turn 5, I started with Panzer Group A and retreated a tank that was knocked down to 5 strength by two polish tank attacks during the CPU turn. Fortunately, with air superiority still firmly in my hands, I was able to bring my stukas in and badly damage the enemy tanks. I followed the stuka attacks with a tank and destroyed the heavier polish tank. With Panzer Group B, I used a double bombardment on the polish troops guarding Ciechanow, and destroyed them with a full assault by 3 of my surrounding units. I then drove @fignuts unit forward (yet to be named for him) to scout the defenses guarding Pultusk, and found only a single AT gun with no artillery backing placed on a river hex. CPU Dummy!
In turn 6, I flew a stuka forward and attacked an armored train called 'Śmierć (Death) that is guarding Modlin fort. I'm going to have a fight on my hands here with Panzer Brigade A which is not well suited for this type of work. In good news, Panzer Brigade B is still making great progress and appears ready to take their 3rd objective of Pultusk next turn. Panzer Group A did make some progress grinding up the outer defenses Modlin, destroying a tank and cavalry unit.
GR8 2 B FL G8R
Well-Known Member
Kerscher is clearly Illuminati